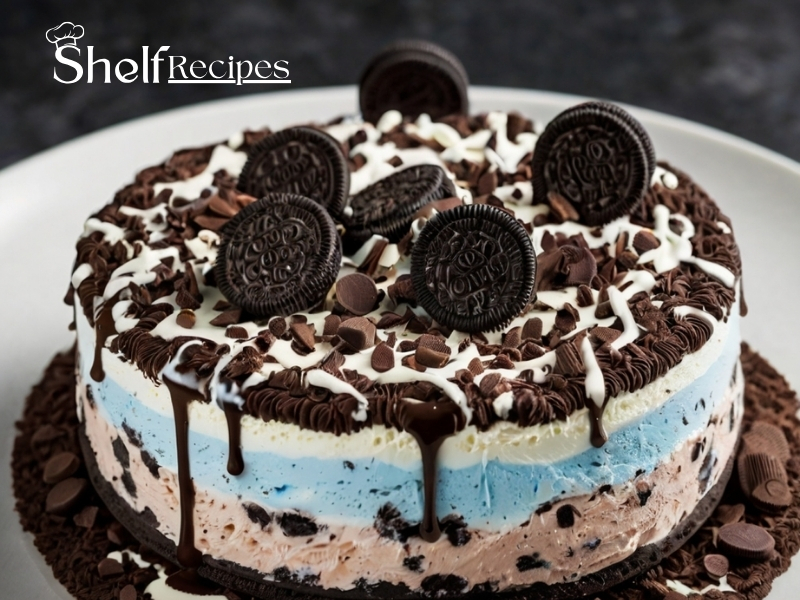
Craving something sweet, creamy, and packed with that iconic Oreo crunch? Look no further than the Oreo Ice Cream Cake! This dessert combines the beloved flavors of Oreos with rich ice cream for a treat that’s perfect for any occasion.
Introduction to Oreo Ice Cream Cake
Oreo Ice Cream Cake is more than just a dessert; it’s an experience. Whether you’re enjoying a summer day, indulging in a sweet treat, or looking to impress with a homemade delight, this cake is sure to be a crowd-pleaser. Here, we’ll dive into how you can make this delightful treat in your kitchen.
Why Make an Oreo Ice Cream Cake?
- Simplicity: There’s no need for an oven or baking skills; this dessert is all about assembly. The process involves crushing cookies, mixing them with butter, and layering ice cream, making it accessible for beginners and seasoned cooks alike. It’s the perfect no-bake dessert for hot days or when you want something sweet without turning on the oven.
- Flavor Profile: The Oreo Ice Cream Cake brings together two beloved flavors in a harmonious way. The crunch of the Oreo crust contrasts beautifully with the creamy, cold ice cream, creating a sensory experience that’s hard to beat. This dessert evokes a sense of nostalgia for many, reminiscent of childhood treats, yet it’s sophisticated enough for adult palates.
- Versatility: This cake isn’t just for special occasions; it’s a versatile dessert that fits into casual and formal settings alike. It can be adapted for various dietary needs like gluten-free or vegan diets, and you can experiment with different ice cream flavors or mix-ins to match the season or personal taste preferences.
Benefits of Homemade Ice Cream Cake
- Control Over Ingredients: When you make your own Oreo Ice Cream Cake, you’re in charge. You can select high-quality ice cream, choose cookies with fewer preservatives, or even make your ice cream for an artisanal touch. This control extends to sweetness, calories, and nutritional content, allowing you to tailor the cake to your health or dietary goals.
- Cost-Effective: Buying ingredients in bulk or using what you already have at home can significantly reduce the cost compared to purchasing a pre-made ice cream cake. Plus, you can make larger quantities for gatherings, which can be more economical than buying individual desserts.
- Freshness: There’s nothing quite like the taste of a dessert that’s been made just hours before serving. The flavors are more vibrant, and the texture of the ice cream is at its peak, providing a superior eating experience compared to store-bought options that might have been frozen for weeks.
Ingredients Overview of Oreo Ice Cream Cake
- Oreos: Not only do they form the base of your cake, but when crushed and mixed with butter, they create a delightful crust that’s both sweet and crumbly. Using Oreos also means you get little bursts of cookies in every bite of ice cream.
- Ice Cream: The choice of ice cream can dramatically alter the cake’s taste. Vanilla is classic, but you can go for chocolate, mint, or even seasonal flavors. The texture of the ice cream when slightly softened is key to achieving those perfect layers.
- Butter: Acts as the glue for the crust, but if you’re looking to make it healthier, you can use alternatives like coconut oil, which also adds a subtle flavor.
- Optional Add-Ins: These can range from chocolate chips for extra indulgence, nuts for texture, or fruits for a fresh contrast. They allow you to customize the cake to your or your guests’ preferences.
What You’ll Learn
- Layering Techniques: Beyond just spreading ice cream, you’ll learn how to create distinct layers with different flavors or textures, how to achieve a marbled effect, or how to layer for visual impact.
- Freezing Tips: Understanding how long to freeze, how to cover the cake to prevent freezer burn, and when to let it thaw slightly for serving will ensure your cake is at its best. You’ll also learn about the importance of freezing each layer before adding the next for a defined look.
- Presentation: Even if you’re not a professional decorator, you’ll pick up tips on garnishing with Oreos, using whipped cream creatively, or even incorporating edible flowers or herbs for an elegant touch. This section will teach you how to make your cake not just taste good but look spectacular, enhancing the overall dining experience.

Oreo ice cream cake
Ingredients
- 1 package of Oreo cookies
- 1/2 gallon of vanilla ice cream softened
- 1/2 cup of melted butter
- Whipped cream optional for decoration
- Chocolate syrup optional
Instructions
Crust Preparation
- Crush the Oreos in a food processor or with a rolling pin until they are fine crumbs.
- Mix the crumbs with melted butter until well combined.
- Press this mixture into the bottom of a springform pan or a lined cake tin to form the crust. Chill in the freezer for about 10 minutes.
Ice Cream Layer
- Spread the softened vanilla ice cream over the chilled crust, smoothing it out evenly.
- If you wish, you can mix in some crushed Oreos into the ice cream for an extra layer of texture.
Freezing
- Cover the cake with plastic wrap and freeze for at least 4 hours, or until the ice cream is firm.
Decoration
- Once set, remove from the freezer, and if using, decorate with whipped cream and more crushed Oreos or drizzle with chocolate syrup.
Kitchen Tools Needed
- Food Processor or Rolling Pin: To crush the Oreos into crumbs for the crust.
- Springform Pan or Cake Tin: For shaping and setting the cake, ideally 9-inch for standard recipes.
- Mixing Bowl: To Combine the Oreo crumbs with butter.
- Spatula or Spoon: For spreading the ice cream evenly over the crust.
- Measuring Cups and Spoons: For accurate ingredient measurements.
- Plastic Wrap or Aluminum Foil: For covering the cake while it freezes.
- Knife: Preferably serrated, for slicing the cake once it’s set.
- Freezer: Essential for setting the cake, with enough space to accommodate the pan.
Serving Suggestions for Oreo Ice Cream Cake
- Room Temperature Softening: Let the Oreo Ice Cream Cake sit at room temperature for about 10-15 minutes before you plan to serve it. This slight thawing will make slicing through the layers much easier, ensuring you get clean, beautiful slices without them crumbling or sticking to the knife.
- Accompaniments:
- Additional Cookies: Serve each slice with a side of whole or crumbled Oreos for an extra crunch. This not only enhances the flavor but also adds to the visual appeal of your dessert presentation.
- Variety of Ice Creams: Offer a scoop of a different ice cream flavor alongside each slice. Think about complementing flavors like chocolate, mint chocolate chip, or even a coffee ice cream to add depth to the taste profile.
- Garnishing: A dollop of whipped cream, a drizzle of chocolate or caramel sauce, or even a sprinkle of nuts can elevate the look and taste, making each serving feel like a special treat.
Tips for the Perfect Cake
If you want more delicious cakes, check out how to make Neapolitan Cake at Home.
- Ice Cream Consistency: The key to a well-layered Oreo Ice Cream Cake is the consistency of the ice cream. It should be soft enough to spread smoothly but not so melted that it becomes runny. A good rule of thumb is to let the ice cream sit out for about 5-10 minutes before use, depending on the room temperature.
- Cutting Technique: To achieve those Instagram-worthy slices, dip your knife in hot water before cutting each slice. Wipe it clean after each cut to prevent sticking. This method ensures a clean cut through the frozen layers.
- Flavor Experimentation: Don’t limit yourself to vanilla ice cream. Mixing in or layering with other flavors like chocolate, mint, or even cookies and cream can create a new experience each time. You could also try seasonal flavors like pumpkin or eggnog for a festive twist.
- Crust Consistency: When pressing the crust into the pan, use the flat bottom of a glass or measuring cup for even distribution. This ensures the base is firm and holds up well against the weight of the ice cream.
Healthier Alternatives
- Ice Cream Choices: Opt for low-fat or non-dairy ice cream alternatives like those made from almond, coconut, or oat milk. These options can reduce the calorie count and cater to different dietary preferences or restrictions.
- Crust Modifications:
- Butter Reduction: You can cut down on butter by using just enough to bind the crumbs or by replacing part of the butter with a fruit puree like apple sauce for natural sweetness and moisture.
- Healthier Fats: Instead of butter, try using coconut oil, which has health benefits including MCTs (medium-chain triglycerides).
- Sweetener: If making a homemade ice cream layer, consider using natural sweeteners like honey, maple syrup, or stevia to lower the sugar content without sacrificing sweetness.
- Add-ins: Incorporate healthy mix-ins like nuts, seeds, or a swirl of fruit puree for added nutrition and flavor. This not only makes the cake healthier but also adds a variety of textures and tastes.
Innovative Layering Techniques
- Marbling Effect: For a visually stunning cake, after spreading your base layer of ice cream, drizzle in some melted chocolate or a contrasting ice cream flavor. Use a skewer or knife to swirl the two together before freezing for a marbled look.
- Layered Flavors: Instead of one uniform ice cream layer, consider making several thin layers alternating between different ice cream flavors or mix-ins like chopped fruits or nuts. Freeze each layer before adding the next for definition.
For more inspiration on layering techniques, check out Taste of Home’s Ice Cream Cake Ideas.
Decorating Your Oreo Ice Cream Cake
- Oreo Toppings: Beyond just crumbling Oreos on top, create designs or patterns with whole and broken cookies. You could make a flower, write a message, or even construct a small Oreo “wall” around the edge of the cake.
- Edible Flowers or Herbs: For a touch of elegance, garnish with edible flowers like violets or nasturtiums, or herbs like mint leaves for a fresh contrast to the sweetness.
Learn more about decorating with edible flowers from The Spruce Eats.
Storing Your Ice Cream Cake
- Freezer Storage: Always store your Oreo Ice Cream Cake in the freezer to preserve its texture and flavor. If you used a springform pan, keep it in the pan until serving to prevent any structural collapse.
- Wrap Well: Cover with plastic wrap or place in an airtight container to prevent freezer burn. For extended storage, wrap in aluminum foil over the plastic wrap.
- Thawing: If you need to transport or serve later, take it out of the freezer about 10-15 minutes before serving, but don’t let it thaw too much to maintain its shape.
Making It for a Crowd
- Size Up: Easily scale up the recipe by using a larger pan or doubling the ingredients for a sheet cake version. This is perfect for larger gatherings where you want to impress with minimal effort.
- Individual Servings: For a fun twist, make individual Oreo Ice Cream Cake cups using muffin tins lined with cupcake liners. This not only makes serving easier but also allows for different flavors or mix-ins in each cup.
Dietary Adaptations
- Gluten-Free: Use gluten-free Oreo-style cookies for the crust or make your crust with gluten-free biscuits or cookies.
- Vegan: Opt for vegan ice cream and check that your Oreos are vegan (some are, some aren’t). Use a non-dairy butter alternative for the crust.
- Allergy-Friendly: If catering to nut allergies, ensure your ice cream and add-ins are nut-free. For dairy allergies, there are plenty of dairy-free ice cream options available.
FAQs
Q: Can I use store-bought ice cream cake mix instead of making my own from scratch?
- A: Absolutely, if you’re short on time, there are pre-made Oreo ice cream cake mixes available that you can customize with your own Oreos or additional toppings. However, homemade tends to offer more control over ingredients and flavor.
Q: How long can I store the Oreo Ice Cream Cake in the freezer?
- A: When stored properly wrapped or in an airtight container, it can last up to two months. However, for the best taste and texture, it’s recommended to consume within one month.
Q: My ice cream cake is too hard to cut. What should I do?
- A: Let it sit at room temperature for about 10-15 minutes to soften slightly. Also, dipping your knife in hot water before slicing can help make cleaner cuts.
Q: Can I make this recipe without a springform pan?
- A: Yes, you can use a regular cake tin lined with parchment paper for easier removal. Just ensure it’s freezer-safe.
Q: Is there a way to make this cake less sweet?
- A: You can reduce the sweetness by using fewer Oreos in the crust or choosing an ice cream with less sugar. Alternatively, balance the sweetness with a tart fruit layer or compote.
Q: What if I don’t have Oreos?
- A: Any chocolate sandwich cookie can work as a substitute. You could also experiment with other cookie types for a different flavor profile, like vanilla wafers or chocolate chip cookies.
Q: Can I add other flavors or ingredients to the ice cream layer?
- A: Definitely! You can mix in nuts, chocolate chips, fruit, or even swirl in a sauce like caramel or peanut butter before freezing for added flavor and texture.
Conclusion
The Oreo Ice Cream Cake is more than just a dessert; it’s a celebration of flavors that can bring joy to any gathering. With its simple preparation, you can impress your friends and family with minimal effort. Enjoy this sweet treat and savor every bite!