Hot Chocolate Bombs Recipe Easy to Make & Perfect for Gifting
Learn how to make perfect hot chocolate bombs with our easy, foolproof recipe. Enjoy rich chocolatey goodness in minutes. Get the recipe today.
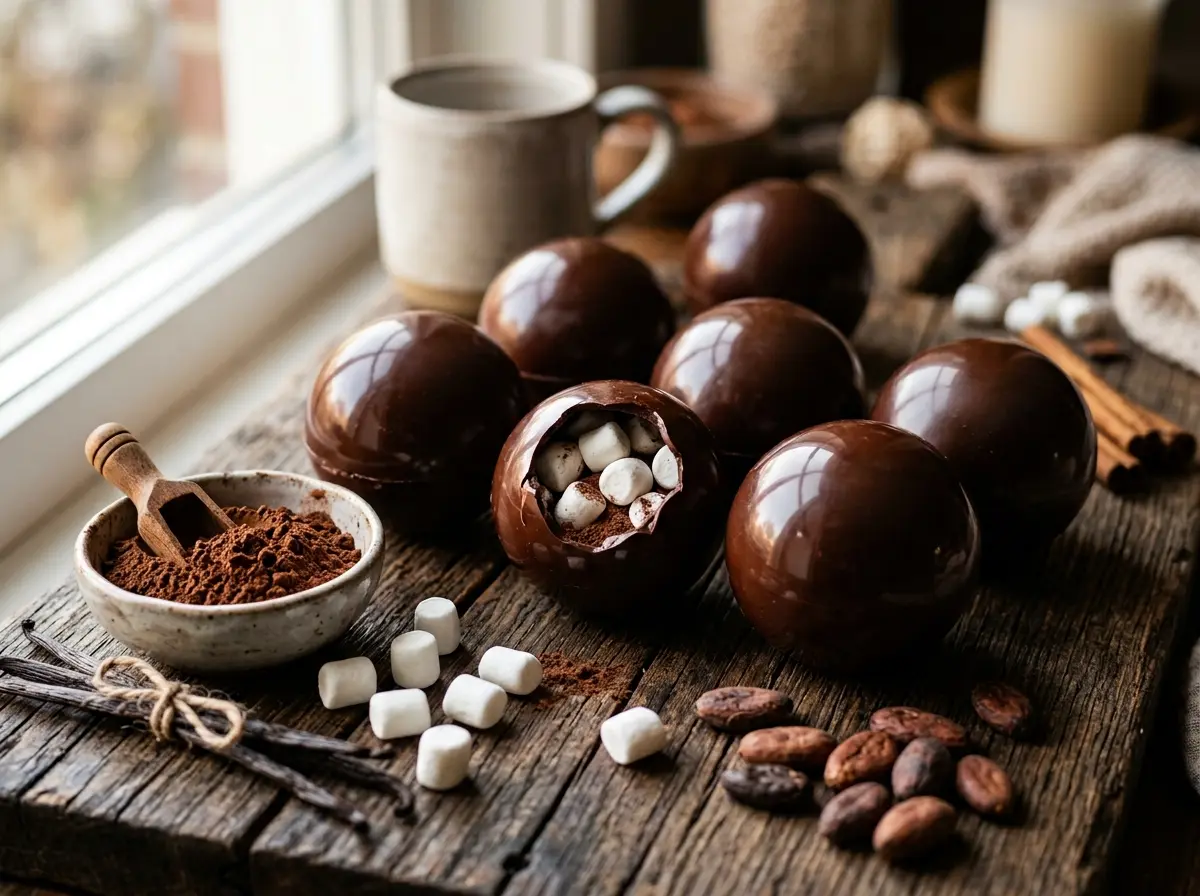
Hot chocolate bombs have become the ultimate cozy treat, transforming ordinary milk into a magical explosion of chocolatey goodness. These delightful spheres combine artistry with functionality, creating an interactive experience that brings joy to both makers and recipients. Perfect for gifting or enjoying at home, hot chocolate bombs offer endless possibilities for customization and creativity.
The satisfying crack as hot milk melts through the chocolate shell reveals hidden treasures of cocoa mix and fluffy marshmallows. This creates a theatrical moment that turns a simple beverage into an experience worth savoring. The rich aroma of melting chocolate combined with the anticipation of that first sip makes every cup feel like a special occasion.
Introduction
Easy hot chocolate bombs have captured hearts worldwide as the perfect blend of visual appeal and comfort food satisfaction. These hollow chocolate spheres filled with cocoa mix and marshmallows create an instant treat when combined with hot milk. Their popularity stems from both their Instagram-worthy appearance and the genuine joy they bring to cold winter evenings.
What makes this recipe particularly beginner-friendly is the forgiving nature of chocolate work when proper techniques are applied. Unlike complex confections requiring years of practice, homemade hot chocolate bombs can be mastered in a single afternoon. The key lies in understanding temperature control and working with chocolate’s natural properties rather than fighting against them.
The Science Behind Perfect Chocolate Shells
Successful chocolate bombs depend on achieving the right balance between thickness and brittleness. Too thin, and they’ll crack during handling; too thick, and they won’t melt properly in hot milk. The ideal shell thickness ranges between 2-3 millimeters, creating enough structure while maintaining the satisfying break when heated liquid hits the surface.
Ingredients and Equipment Needed
Quality ingredients form the foundation of exceptional DIY hot chocolate bombs. Dark chocolate with 60-70% cocoa content provides the best balance of flavor and workability, while milk chocolate offers a sweeter, more approachable option for younger palates. Organic varieties often contain fewer additives, resulting in smoother tempering and better overall results.
Alternative sweeteners like coconut sugar or maple powder can replace traditional cocoa mix for those seeking refined-sugar-free options. These natural alternatives maintain the rich chocolate flavor while providing subtle complexity that enhances the overall drinking experience.
Essential Equipment for Success
Silicone sphere molds represent the most critical tool investment for consistent results. Food-grade silicone withstands temperature fluctuations better than plastic alternatives and releases finished bombs more easily. Half-sphere molds with 2.5-3 inch diameters create the ideal size for single servings while allowing adequate filling space.
A digital thermometer ensures precise temperature control during chocolate tempering. This tool eliminates guesswork and helps achieve that professional glossy finish that makes homemade bombs rival store-bought versions.
Additional helpful tools include offset spatulas for smooth chocolate spreading, small brushes for detailed work, and parchment paper for easy cleanup. These items, while not absolutely essential, significantly improve the crafting experience and final presentation quality.
Step-by-Step Instructions
Preparing and Tempering the Chocolate
Proper chocolate tempering creates stable crystals that result in glossy, snap-worthy shells resistant to blooming and cracking. The seeding method works best for home kitchens, involving melting two-thirds of your chocolate to specific temperatures before adding the remaining third as “seed” crystals. For dark chocolate, heat to 115°F (46°C), then cool to 84°F (29°C) before rewarming to 88°F (31°C).
Milk chocolate requires slightly lower temperatures due to its milk protein content. Heat to 110°F (43°C), cool to 81°F (27°C), then rewarm to 86°F (30°C) for optimal results. These precise temperatures ensure proper crystal formation that prevents white bloom and maintains structural integrity.
Stir continuously during the cooling phase to distribute heat evenly and encourage uniform crystal development. The chocolate should appear glossy and coat a spoon smoothly when properly tempered.
Molding the Chocolate Spheres
Clean, dry molds prevent water spots and ensure smooth demolding later. Pour tempered chocolate into each half-sphere cavity, filling completely before inverting to drain excess chocolate back into your working bowl. This technique creates even wall thickness while eliminating air bubbles that could cause weak spots.
Allow the first coat to set for 2-3 minutes before applying a second layer for added strength. The double-coating method ensures bombs won’t crack during assembly or storage while maintaining the delicate appearance customers expect.
Refrigerate filled molds for 10-15 minutes until chocolate pulls slightly away from the silicone edges. Over-chilling can cause condensation issues, while insufficient cooling leaves shells too soft for safe removal.
Filling the Bombs
Traditional hot cocoa mix provides the classic flavor profile most people expect from hot chocolate bombs. Measure approximately 1 tablespoon of mix per bomb to ensure proper chocolate-to-cocoa ratios in the finished beverage. Premium cocoa powders with higher fat content create richer, more luxurious drinking experiences.
Mini marshmallows add textural interest and visual appeal when the bomb melts. Freeze-dried varieties hold their shape better during storage and provide more dramatic expansion when heated. Standard mini marshmallows work perfectly well but may settle during extended storage periods.
Creative additions like crushed peppermint, cinnamon chips, or caramel pieces transform basic bombs into gourmet experiences. Limit add-ins to 1-2 elements per bomb to prevent overfilling and maintain structural integrity.
Sealing and Finishing Touches
Warming a clean plate or skillet over low heat creates the perfect sealing surface for joining chocolate hemispheres. Gently press each filled half against the warm surface for 1-2 seconds to soften the rim, then immediately join with its partner while applying gentle, even pressure around the seam.
The heat-sealing method creates invisible joins that maintain the illusion of solid chocolate spheres. Work quickly but deliberately, as overheated edges can create messy seams or cause structural weakness.
Decorative elements like drizzled chocolate, edible glitter, or cocoa powder dusting add professional finishing touches. Apply decorations immediately after sealing while the surface chocolate remains slightly tacky for better adhesion.
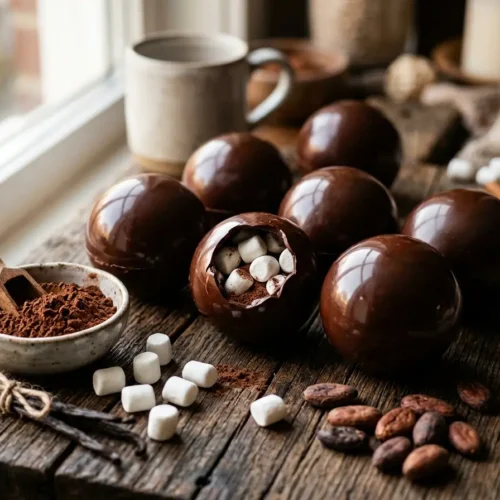
Homemade Hot Chocolate Bombs
Equipment
- Silicone sphere molds (6-cavity, 2.5-inch diameter)
- Double boiler or microwave-safe bowl
- Candy thermometer
- Small pastry brush
- Warm plate or griddle
- Small spoon for filling
Ingredients
- 12 oz Dark Chocolate Chips 70% cacao, finely chopped (340g)
- 1 tablespoon Coconut Oil refined, for tempering (15ml)
- 3 tablespoons Organic Cocoa Powder unsweetened (45g)
- 2 tablespoons Maple Syrup pure grade A (30ml)
- 1/4 teaspoon Pure Vanilla Extract not imitation (1.25ml)
- 1/8 teaspoon Sea Salt fine
- 1 cup Mini Marshmallows halal-certified (30g)
- 2 tablespoons Crushed Freeze-Dried Strawberries optional natural flavoring (15g)
- 1 tablespoon Crushed Freeze-Dried Raspberries optional natural flavoring (8g)
Instructions
- Melt chocolate and coconut oil in a double boiler, stirring constantly until mixture reaches 115°F (46°C) on candy thermometer. Remove from heat and continue stirring until temperature drops to 84°F (29°C) for proper tempering.
- Using a pastry brush, coat the inside of each silicone sphere mold cavity with a thin, even layer of tempered chocolate. Ensure complete coverage with no thin spots. Refrigerate for 5 minutes until set.
- Apply a second coat of chocolate to strengthen the shells, brushing in the opposite direction from the first coat. Refrigerate for another 5 minutes until completely firm and easily releases from molds.
- In a small bowl, whisk together cocoa powder, maple syrup, vanilla extract, and sea salt until smooth and well combined. The mixture should be slightly thick but pourable.
- Carefully remove chocolate half-spheres from molds by gently pressing on the bottom. Handle with clean, dry hands to avoid fingerprints on the chocolate.
- Fill 6 half-spheres with 1 teaspoon of hot chocolate mix, 4-5 mini marshmallows, and a pinch of crushed freeze-dried fruits if using. Do not overfill.
- Warm a clean plate or griddle over low heat for 30 seconds. Gently press the rim of empty half-spheres onto the warm surface for 2-3 seconds to slightly melt the edges.
- Immediately press the warmed half-sphere onto a filled half-sphere, rotating slightly to seal the seam completely. Hold for 10 seconds until set.
Notes
Nutrition Highlights (Per Serving – Approximate)
Understanding your food’s composition is key to balanced eating. Here is an approximate nutritional breakdown calculated for a standard serving based on wholesome preparation guidelines:
Culinary Selection Notes
- Adjusting sweetener densities or using refined-sugar alternatives will directly optimize the overall glycemic load without breaking structural balance.
- Focusing on high-quality whole fats maximizes trace micronutrient retention across low-temperature or baking environments.
How to Use Hot Chocolate Bombs
The magic moment arrives when hot milk meets your carefully crafted chocolate bomb. Heat 6-8 ounces of milk to just below boiling point (around 180°F) for optimal melting action without scalding. Pour the steaming milk directly over the bomb placed in your favorite mug, watching as the chocolate shell dissolves to reveal its hidden treasures.
Stir gently with a spoon to fully incorporate the cocoa mix and distribute melted marshmallows throughout the beverage. The stirring action helps achieve uniform flavor distribution while creating that satisfying frothy texture characteristic of quality hot chocolate.
Alternative Milk Options
Plant-based milk alternatives work beautifully with hot cocoa bombs, though heating techniques may vary slightly. Oat milk and coconut milk provide rich, creamy bases that complement chocolate flavors naturally. Almond milk offers a lighter option while still delivering satisfying results.
Heat plant-based milks more gently than dairy versions to prevent curdling or separation. Bring to a gentle simmer rather than a rolling boil for best texture and flavor integration.
Storage Tips
Proper storage extends the shelf life of homemade hot chocolate bombs while maintaining their structural integrity and flavor quality. Airtight containers prevent moisture absorption that can cause chocolate bloom or compromise the crisp shell texture. Glass containers with tight-fitting lids or food-grade plastic storage boxes work equally well for home storage.
Layer bombs between sheets of parchment paper to prevent sticking and surface damage during storage. This technique also makes individual removal easier without disturbing remaining bombs in the container.
Optimal Storage Conditions
Cool, dry environments between 60-70°F provide ideal storage conditions for chocolate bomb longevity. Avoid refrigeration unless your kitchen exceeds 75°F regularly, as temperature fluctuations can cause condensation and surface imperfections. Pantry storage or cool cabinets away from heat sources maintain consistent conditions.
Properly stored homemade hot chocolate bombs maintain quality for 2-3 weeks at room temperature. Commercial-grade chocolate may extend this timeline slightly, while organic varieties might have shorter optimal periods due to fewer preservatives.
Monitor stored bombs for signs of chocolate bloom (white spots) or surface changes that indicate quality degradation. While bloomed chocolate remains safe to consume, the texture and appearance may be compromised.
Variations and Special Diet Options
Vegan Hot Chocolate Bombs
Vegan hot chocolate bombs require careful ingredient selection but deliver equally satisfying results. Dark chocolate varieties often contain fewer dairy ingredients, though always verify labels for milk powder or other animal-derived components. High-quality vegan chocolates made with coconut milk or oat milk bases provide excellent tempering properties and rich flavor profiles.
Plant-based marshmallows made from aquafaba or agar create the same delightful surprise element as traditional versions. These alternatives often have slightly different melting characteristics but maintain the visual appeal and textural interest customers expect.
Coconut milk powder or cashew-based cocoa mixes offer creamy alternatives to dairy-based hot chocolate powders. These options often provide additional nutrients while maintaining the indulgent experience that makes hot chocolate bombs special.
Gluten-Free Considerations
Most pure chocolate and cocoa powders naturally contain no gluten, making gluten free hot chocolate bombs relatively straightforward to achieve. However, cross-contamination during processing can introduce trace amounts, so certified gluten-free labels provide additional assurance for sensitive individuals.
Flavoring additions like cookie crumbs or cake pieces require gluten-free alternatives to maintain dietary compliance. Crushed gluten-free cookies or rice cereal provide similar textural elements without compromising safety.
Seasonal Flavor Combinations
Natural flavor extracts transform basic chocolate bombs into seasonal specialties without artificial additives. Pure peppermint extract creates refreshing winter bombs, while orange zest adds bright citrus notes perfect for holiday gifting. Cinnamon and nutmeg combinations evoke warming spice profiles ideal for autumn celebrations.
Freeze-dried fruit powders provide intense natural flavors without added moisture that could compromise chocolate stability. Strawberry, raspberry, or cherry powders create stunning color variations while maintaining structural integrity during storage.
Troubleshooting Common Issues
Preventing and Fixing Cracks
Cracked chocolate shells typically result from temperature shock or overly thin coating layers. Gradual temperature changes during cooling prevent thermal stress that causes surface fractures. Allow bombs to cool slowly at room temperature before refrigerating for final setting.
If cracks do appear, small fissures can be repaired using tempered chocolate applied with a small brush or offset spatula. Work quickly while the repair chocolate remains workable, blending edges smoothly into surrounding surfaces for invisible repairs.
Prevention remains more effective than repair, so focus on consistent wall thickness and gradual temperature changes throughout the molding process.
Solving Sealing Problems
Uneven or weak seams often stem from insufficient heat application during the joining process. Ensure your warming surface reaches adequate temperature to soften chocolate edges without overheating. Practice with scrap chocolate pieces to develop proper timing and pressure techniques.
Mismatched hemisphere sizes can create sealing challenges that result in visible gaps or structural weakness. Verify molds produce consistent sizes before beginning production, and sort finished halves by size for optimal matching during assembly.
Temperature Control Issues
Chocolate that won’t set properly usually indicates temperature problems during tempering or storage. Verify thermometer accuracy using ice water (32°F) and boiling water (212°F) calibration checks before troubleshooting chocolate-specific issues.
Overheated chocolate loses temper and requires complete restarting of the tempering process. While frustrating, this approach ensures proper crystal formation and prevents ongoing quality issues in finished products.
Gift Packaging Ideas
Thoughtful presentation transforms homemade hot chocolate bombs into memorable gifts that recipients treasure long after the chocolate disappears. Clear cellophane bags tied with colorful ribbons showcase the craftsmanship while protecting surfaces from fingerprints and environmental damage. Individual packaging allows recipients to save some bombs for later while enjoying immediate gratification.
Small gift boxes lined with tissue paper create elegant presentations suitable for formal gifting occasions. Choose boxes slightly larger than the bombs themselves to allow cushioning materials that prevent movement and potential damage during transport.
Budget-Friendly Packaging Solutions
Mason jars provide reusable containers that add rustic charm while offering practical storage after the bombs are consumed. Layer bombs between tissue paper or decorative shredded paper for visual appeal and protection. Include simple instruction cards explaining proper usage for recipients unfamiliar with chocolate bomb preparation.
Brown paper bags decorated with stamps, stickers, or hand-drawn designs offer personalized touches that cost very little but show significant thoughtfulness. These casual presentations work perfectly for neighbor gifts, teacher appreciation, or casual friend exchanges.
Professional Presentation Tips
Consistent labeling elevates homemade gifts to professional standards without significant cost investment. Simple ingredients lists and storage instructions demonstrate attention to detail while helping recipients with dietary restrictions or allergies make informed decisions.
Color-coordinated packaging materials create cohesive visual themes that suggest careful planning and consideration. Match ribbon colors to seasonal themes or recipient preferences for personalized touches that show extra thoughtfulness.
Frequently Asked Questions (FAQ)
Can I make hot chocolate bombs without special molds?
While silicone sphere molds produce the most professional results, creative alternatives can work for casual home use. Large spoons or ladles can create rustic shell shapes, though achieving uniform wall thickness becomes more challenging. The key lies in working quickly with properly tempered chocolate regardless of mold type.
How far in advance can I prepare hot chocolate bombs?
Hot chocolate bombs maintain optimal quality for 2-3 weeks when stored properly at room temperature. This timeline makes them excellent make-ahead gifts for holiday seasons or special events. Prepare bombs during convenient times, then focus on packaging and presentation closer to gift-giving dates.
What’s the best chocolate type for beginners?
Dark chocolate with 60-65% cocoa content offers the best balance of flavor and workability for novice chocolate workers. Higher cocoa percentages can become brittle, while lower percentages may not set firmly enough for reliable demolding. Milk chocolate works well but requires more careful temperature control during tempering.
Can children help make hot chocolate bombs?
Adult supervision ensures safety during chocolate melting and tempering phases, but children can assist with filling, decorating, and packaging activities. These collaborative experiences create lasting memories while teaching basic culinary skills. Assign age-appropriate tasks that keep young helpers engaged without compromising safety or quality.
Conclusion
Creating hot chocolate bombs at home combines artistry with culinary science, resulting in delightful treats that bring joy to both makers and recipients. The satisfaction of mastering chocolate tempering techniques while crafting personalized gifts creates lasting memories that extend far beyond the final sip of hot chocolate. These skills transfer to other chocolate projects, opening doors to expanded confectionery adventures.
Whether preparing bombs for family enjoyment or elegant gift presentations, the techniques outlined here provide reliable foundations for consistent success. Start with basic versions to build confidence, then explore creative variations that reflect personal tastes and seasonal inspirations.
Share your hot chocolate bomb creations with friends and family, spreading the joy of handcrafted treats that warm hearts as well as hands. The interactive nature of these special beverages creates connection opportunities that strengthen relationships while satisfying our fundamental desire for comfort and sweetness.
For more chocolate inspiration, explore our chocolate rice krispie balls recipe or try our indulgent Dubai chocolate bar recipe. Don’t miss our perfect chocolate buttercream frosting for your next baking adventure.